 Nick
Nick
So over the last 3 months on the Central Coast, NSW, Australia, we have been locked down and not allowed to leave the house. What better time than now to dust off the old app idea and bring it to life?
This post will most likely end up as a rambling bunch of mess, but I wanted to go into the tech stack behind the app, along with a few things that have caught me out. Mostly wanted to share some cool things I have learned and found along the way
The App —A Shameless Plug
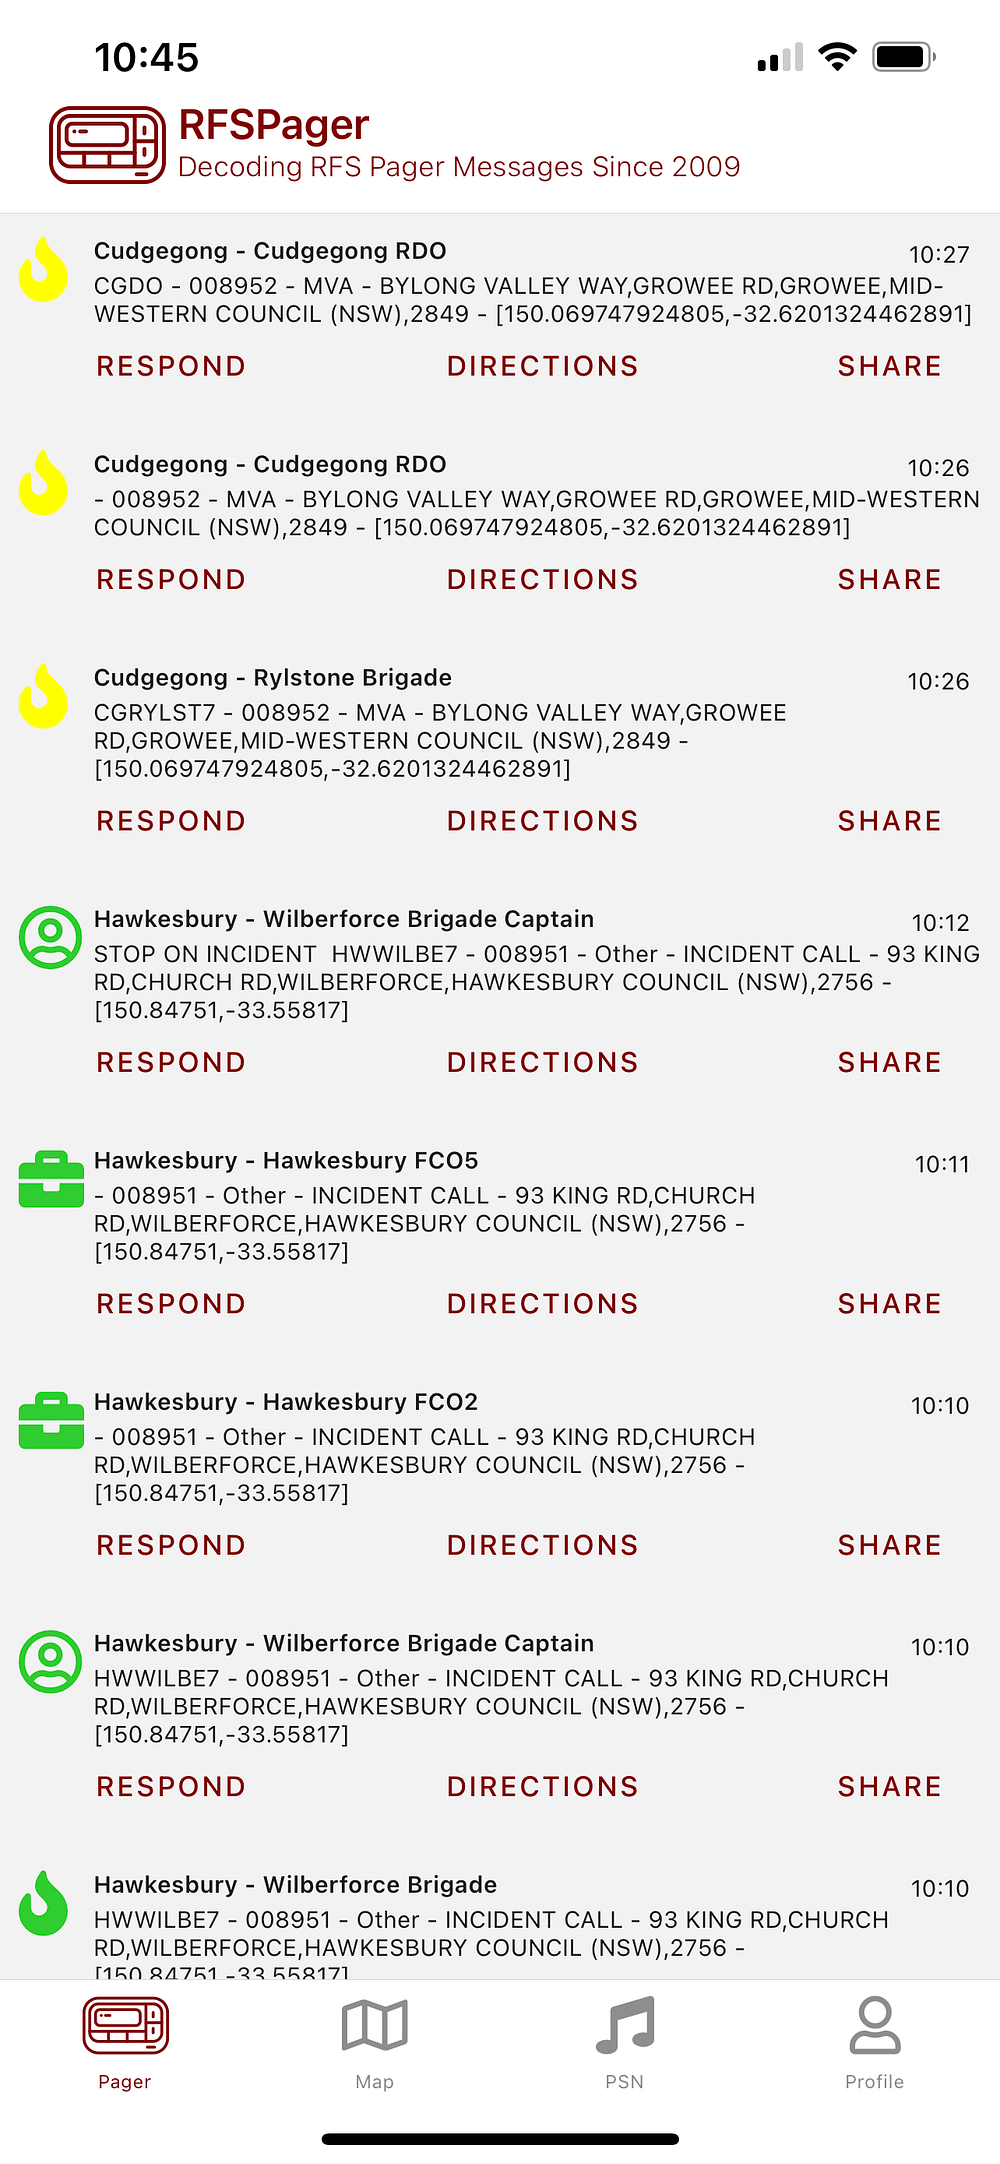
RFSPager [Play Store] [App Store] is a mobile application with 3 parts, that I successfully launched on the 17th September 2021.
A friend runs RFSPager.com — which whilst amazing, I wanted push notifications and a better mobile experience!
Over the last month, the user base has hit 300, and MMR is sitting at ~100 AUD with ~50 active subscribers. Not half bad for a single Facebook post as marketing!
The hardware receivers are Raspberry Pis with an RTL2832U TV Tuner, running Raspbian which are scattered around NSW and listen to RFS Pager POCSAG messages, which are sent over the air on 148.5875 Mhz — there are 10 in production now, with plans to continue expanding. Each small text message gets sent to the server for processing and notifications. Each message consists of two parts, a cap code (think of this as a phone number for routing to pagers), and the message itself.
1170176: FIRECALL STRUCTURE FIRE HEBDEN CAD#149838
1440224: SHDO — 008939 — Grass — FIRECALL — RAILWAY PDE,WINGELLO,WINGECARRIBEE COUNCIL (NSW),2579 — [150.1578529999,-34.692667]
The capcode is basically “guessed” through the content of messages over time. The database has been built by a friend that runs the Central Cost Online Scanner. If you are interested, the database can be found here.
The server is a Laravel 8 application that receives the messages from the Raspberry Pis and performs a few functions.
- Capcode to Brigade and Agency lookup — for the message above, this belongs to Hunter Valley, Darlington Brigade
- Message deduplication — As multiple receivers can pick a message up, the server ensures only one gets stored by performing deduplication. In a rolling 5 minute period, a single message is accepted with the same cap code and text. This ensures messages that a repeated daily (such as a Pager test message) will still go through every day.
- User management — This was bootstrapped with Laravel Jetstream
- Capcode subscriptions — Each user can subscribe to one or many capcodes
- Push Notifications — The server sends push notifications to users subscribed to each capcode as a message is received
The mobile app is a react native project written in typescript, bootstrapped with infinitered/ignite, using Expo Application Services for builds.
The mobile app allows users to:
- View a live stream of pager messages
- View a map showing the last 24 hours of messages with a location
- Create and manage Alert Zones
- Subscribe to capcodes for real-time notifications
- “Respond” to incidents, which is akin to a “Like” on Facebook
- Stream the NSW PSN Radio Broadcast from Central Coast Online Scanner
Lighthouse PHP is amazing. This is my first GraphQL based project, and the entire API for the mobile app has been written by defining the GraphQL schema with Lighthouse taking care of talking to the database through the Eloquent models. The server has about 50 extra lines of PHP on top of Lighthouse with 1 custom Query and 3 custom mutations which control subscriptions to capcodes. An entire typed API in 50 lines of PHP? SIGN ME UP! The below snippet is all that’s required to get a stream of messages from the database.
mst-gql is the best GraphQL client you have never heard of! No, Seriously! In a typescript world, bootstrapping your models with schema introspection gives you type reusability from the Eloquent model to your react native project — without writing *ANY* code!
mst-gql --format ts --outDir app/models https://rfspager.app/graphql
This single command bootstraps the entire API client ready to go.
To use this in a screen, let’s say our map screen:
You might ask why the WhereConditions are wrapped in a useMemo — and a good catch, but I’ll be adding a feature with a date slider at the bottom of the map soon so you can scroll back in time, so getting ready for that 🙂
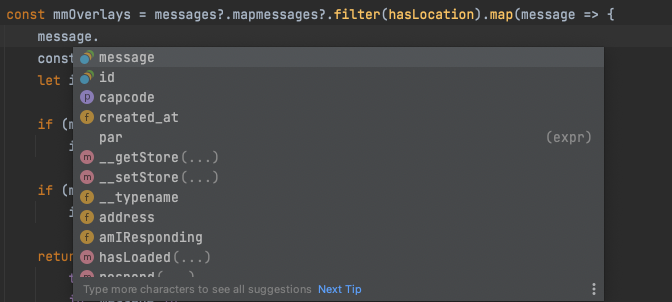
Looking at the IDE now though — it’s all typed! No more remembering what property names are!
Even sub-properties are typed too, so message.capcode.colour works as expected!
Migrating from expo-notifications & expo-ads-admob to React Native Firebase, Notifee, and React Native Admob
Having my hosting environment for this with computing resources, not an issue, I spun up an instance of Sentry On-Prem, to monitor the frontend and backend. It is designed to grab crashes in native code and javascript and make them useful, but unfortunately, I just had so many issues with this — even so much as when sentry was installed it was overwriting some Info.plist strings for location services on the Apple build, which caused Apple to reject the binaries from the App Store.
Annoying!
React Native Firebase to the rescue! Google provides Crashlytics (and a whole suite of developer tools for free) to monitor crashes in apps. I already had deep Google integration for analytics and notifications so pushing data to Crashlytics seems to be the best solution.
yarn add @react-native-firebase/app
yarn add @react-native-firebase/analytics
yarn add @react-native-firebase/crashlyticseas build --profile preview --platform ios
.... a few moments later ....
Build Failed!
Welp! Spent half a long weekend looking at why it failed and how to fix it. Turns out that you can only have a single version of the Google API linked in iOS, and expo-notifications and React Native Firebase was pinned to very different versions. expo-notifications are a few major releases behind! Ok — sweet, let’s just remove expo-notifications and we’ll use Firebase instead!
expo remove expo-notifications
yarn add @react-native-firebase/messagingeas build --profile preview --platform ios
.... a few moments later ....
Build Failed!
Gah! Ok — expo-ads-admob is broken now, same Google API version issue — but upstream Google APIs have removed it so the React Native Firebase team also removed Admob support!
React Native Admob to the rescue — Spent the rest of the long weekend poking the code, getting a working build (with a Google API version the same as RNFirebase — published in a fork) and getting my ads back! It turned out to be fairly simple in the end!
Thankfully I was only using expo-notifications to get push tokens, and was talking directly to FCM and APNS so it wasn’t too bad to refactor that out of the build!
With notifications out of the way again, or so I thought, it was impossible to set the badge count back to 0 on the client-side. Opening the app should mark them all read on the server, then set the badge to 0. This was provided by expo-notifications, but react-native-firebase/messaging did not have that same feature! It was moved to Notifee by the Invertase team.
Ok — Notifee isn’t using any remote maven repository, so I spent a night working out how to manipulate the Project Build Gradle file on Android to add a local repository with EAS build. Out comes https://github.com/invertase/notifee/pull/190 which adds an expo config plugin to Notifee for that sweet expo install experience!
Turns out config plugins are a relatively new and simple way to manipulate native builds. Woo! Builds are all green, and all features are working again!
Implementing Anonymous Login!
Now that I had good analytics and a better overall structure to the base services in the app, one thing I noticed was 600 first_open users, with only 300 creating an account and using the app almost daily. I wonder if people don’t like handing over data? I initially went with creating accounts thinking sharing notification preferences between devices would be good enough!
Both Apple and Google expose an ID for developers, which is always the same based on a tuple of Device ID, User ID and App Bundle ID— This means that even if a user deletes and re-installs the app — we can generate credentials client-side Using the existing GraphQL mutations, we have implemented this feature in record time!
const anonLogin = async () => {
    setLoading(true)
    const username = getInstallationId() + '@anonymous.rfspager.app'
    const password = getDeviceId() + getInstallationId()

    const loginResult = await storeLogin({username: username, password: password})

    if (loginResult !== 'OK') {
        await storeRegister({name: 'Anonymous User', email: username, password: password, password_confirmation: password})
        setLoading(false)
    }
}
Build pushed, and within 2 days, we have 15 new users — all Anonymous, that will survive across app updates and reinstalls! Sweet!
So what happens when a user wants to convert into a real account? Well, Laravel Jetstream already has that workflow for changing passwords and emails built-in — so we just need to find a way to automatically log people in when they click on a link — as they don’t know the correct username and password.
Enter laravel-magiclink, an amazing library that makes creating login links a breeze. We already have an authentication token stored in our GraphQL client, so the “Update Profile” button does two things:
- Using the already authenticated session, ask the server for a login link
- Opens users default browser with that login link, which redirects back to the profile.show route! Woohoo!
On the server: # schema.graphql
type Query {
    "Magic Link gets a link to use to login via browser"
    magicLink(route: String): String! @guard
}# MagicLink.php
class MagicLink
{
    public function __invoke($_, array $args): string
    {
         $route = $args['route'] ?? 'dashboard';
         return \MagicLink\MagicLink::create(
             new LoginAction(
                 auth()->user(),
                 redirect(route($route))
             )
         )->url;
    }
}And client side:
const openUpdateProfileBrowser = () => {
  queryMagicLink({route: 'profile.show'})
    .then((magicLink) => {
      Linking.openURL(magicLink.magicLink)
    })
}
Sweet — users can now convert to a real account if they want to!
In-App Subscriptions. Adapty made this SO EASY! I’ve seriously written about 50 lines of client-side code for this to display the purchase buttons. Everything else is just handed out of the box. There’s some magic on the server to sync state with Adapty (as we wanted to only offer push notifications to subscribed users) — it’s well worth the $9.00/month per 1k MMR.
const packageItem = (product: AdaptyProduct) => {
    const onSelection = async () => {
        setIsPurchasing(true);
        try {
            const {purchaserInfo} = await adapty.purchases.makePurchase(product)
            if (purchaserInfo.accessLevels['premium'].isActive) {
                setIsPurchasing(false);
                setOnboarded(true)
            }

        } catch (error) {
            if (error.adaptyCode !== "paymentCancelled") {
                Alert.alert('Error purchasing package', error);
            }
        } finally {
            setIsPurchasing(false);
        }
    };

    return (
        <Button
            key={product.vendorProductId}
            icon="shopping-cart"
            mode="contained"
            onPress={onSelection}
        >
            <Text style={styles.purchaseTitle}>{product.localizedTitle} - </Text>

            <Text style={styles.purchasePrice}>{product.localizedPrice}</Text>
        </Button>

    )
}
Super easy, and really nice reporting!
I think that’s enough rambling for the day — thanks for reading! This is still very much a work in progress, and I hope to find more time to expand on this in the future!
